-–убрики
- –” ќƒ≈Ћ»≈ (2432)
- »√–”Ў » (413)
- »« Ѕ”ћј√» (354)
- Ћ≈ѕ ј (303)
- Ў№≈ћ (251)
- Ћ≈ѕ ј ÷¬≈“џ (184)
- ƒ≈ ”ѕј∆ (137)
- јЌ«јЎ» (99)
- ¬џЎ»¬ ј (95)
- Ћ≈ѕ ј ” Ћџ (85)
- Ѕ»—≈– (85)
- —”ћ » (40)
- ѕ–ќ√–јћ » (23)
- ћџЋќ (2)
- ¬я«јЌ»≈ (1504)
- ”«ќ–џ (268)
- ¬я«јЌ»≈ —ѕ»÷јћ» (220)
- ¬я«јЌџ≈ ћ≈Ћќ„» (216)
- ЎјЋ» Ўј–‘џ ѕ≈–„ј“ » Ўјѕ » (159)
- ¬я«јЌ»≈ –ё„ ќћ (155)
- ¬я«јЌјя ќЅ”¬№ (119)
- »–ЋјЌƒ— ќ≈ –”∆≈¬ќ (102)
- ѕќ–џ¬јЋј — ј“≈–“» —јЋ‘≈“ » (73)
- ¬я«јЌџ≈ ёЅ » (30)
- ”Ћ»Ќј–»я (1060)
- «ј ”— » (168)
- Ќј «»ћ” (154)
- ¬џѕ≈„ ј (129)
- ¬“ќ–џ≈ ЅЋёƒј (98)
- ƒ≈—≈–“ (77)
- —јЋј“џ (75)
- –џЅј (59)
- ќ¬ќў» (23)
- —ќ”—џ (21)
- —”ѕџ (15)
- ‘ќ“ќЎќѕ (634)
- ”–ќ » (195)
- ƒЋя ‘Ў (156)
- ќЌ Ћј…Ќ (82)
- ѕЋј√»Ќџ (53)
- –»—ќ¬јЌ»≈ (336)
- «ƒќ–ќ¬№≈ (324)
- ƒЌ≈¬Ќ» ЅЋќ√ (248)
- –ј«Ќќ≈ (151)
- –ј—ќ“ј! (59)
- √–ј‘» ј (58)
- ѕќЋ≈«Ќџ≈ —ќ¬≈“џ (53)
- ќћѕ (52)
- ћ”«џ ј (43)
- »Ќќ (42)
- ÷џ“ј“џ (39)
- ‘Ћќ–»—“» ј (36)
- ЁЌ÷» Ћќѕ≈ƒ»» (25)
- ѕ–»„≈— » (25)
- ƒ»«ј…Ќ (13)
- »√–џ (13)
- ‘Ћ≈Ў (6)
- јЌ»ћјЎ » (4)
- ѕ–ќ√–јћћџ (4)
- ќЅ–јЅќ“ ј ‘ќ“ќ (3)
-ћузыка
- Ѕ. ѕастернак
- —лушали: 2044 омментарии: 0
- √ригорий Ћепс, "Ќатали"
- —лушали: 3315 омментарии: 0
- Lara Fabian Adajio
- —лушали: 5667 омментарии: 0
- Ўарль јзнавур - ¬ечна€ любовь
- —лушали: 12479 омментарии: 0
- Ўелег - "«а “еб€"
- —лушали: 15405 омментарии: 0
-
ƒобавить плеер в свой журнал
© Ќакукрыскин
-я - фотограф
-ѕоиск по дневнику
-ѕодписка по e-mail
-ѕосто€нные читатели
-—ообщества
-—татистика
—оседние рубрики: Ў№≈ћ(251), —”ћ »(40), ѕ–ќ√–јћ »(23), ћџЋќ(2), Ћ≈ѕ ј ÷¬≈“џ(184), Ћ≈ѕ ј(303), јЌ«јЎ»(99), »« Ѕ”ћј√»(354), »√–”Ў »(413), ƒ≈ ”ѕј∆(137), ¬џЎ»¬ ј(95), Ѕ»—≈–(85)
ƒругие рубрики в этом дневнике: ЁЌ÷» Ћќѕ≈ƒ»»(25), ÷џ“ј“џ(39), ‘ќ“ќЎќѕ(634), ‘Ћќ–»—“» ј(36), ‘Ћ≈Ў(6), –” ќƒ≈Ћ»≈(2432), –»—ќ¬јЌ»≈(336), –ј«Ќќ≈(151), ѕ–ќ√–јћћџ(4), ѕ–»„≈— »(25), ѕќЋ≈«Ќџ≈ —ќ¬≈“џ(53), ќЅ–јЅќ“ ј ‘ќ“ќ(3), ћ”«џ ј(43), ”Ћ»Ќј–»я(1060), –ј—ќ“ј!(59), ќћѕ(52), »Ќќ(42), »√–џ(13), «ƒќ–ќ¬№≈(324), ƒЌ≈¬Ќ» ЅЋќ√(248), ƒ»«ј…Ќ(13), √–ј‘» ј(58), ¬я«јЌ»≈(1504), јЌ»ћјЎ »(4)
Ћепим малыша с открытыми глазками |
Ёто цитата сообщени€ kumushki [ѕрочитать целиком + ¬ свой цитатник или сообщество!]
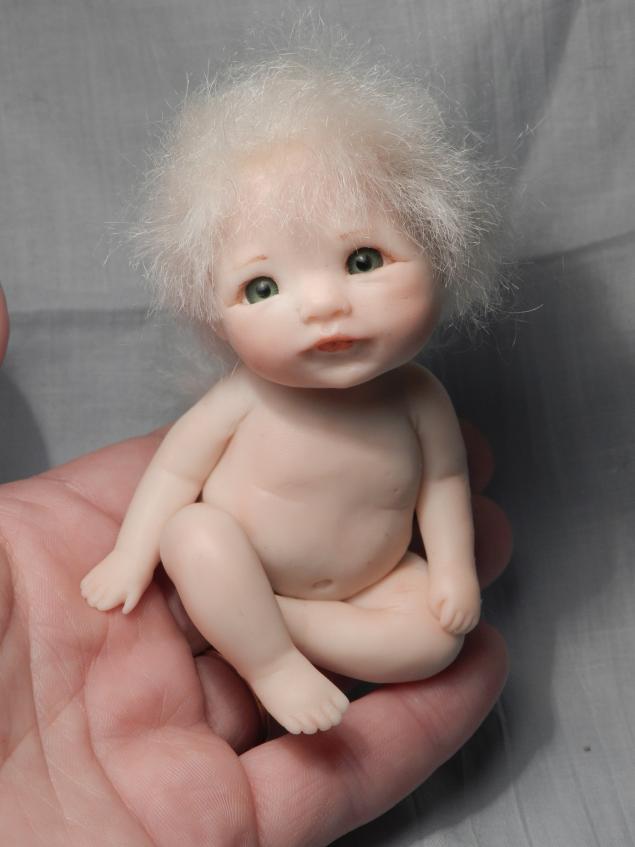
јвтор: Ќаталь€ ѕогребна€
(Natali)
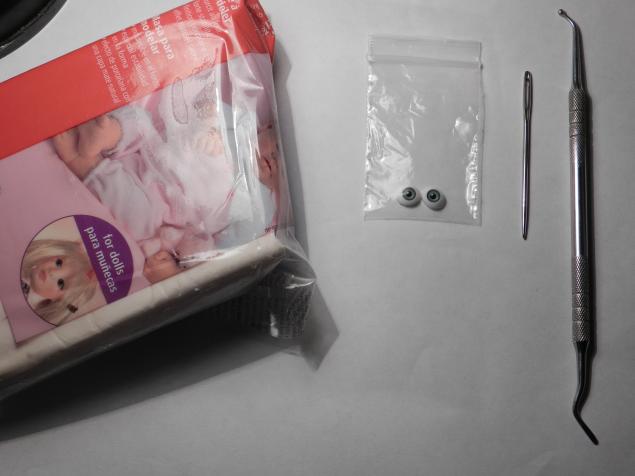
ƒобрый день! Ётот ћ о том, как слепить голову малыша с открытыми глазками. »нструменты и материалы, которые нам понадоб€тс€: полимерна€ глина, глазки, стек и игла с тупым концом.
ѕеред работой рекомендуетс€ как следует разм€ть полимерную глину. ¬ данном ћ использую Puppen Fimo, хот€ это не сама€ мо€ любима€ полимерна€ глина - из минусов - очень сильно липнут ворсинки, т€жело разминаетс€ и в работе не очень лЄгка€. ћои рекомендации - Prosculpt или Living Doll.
|
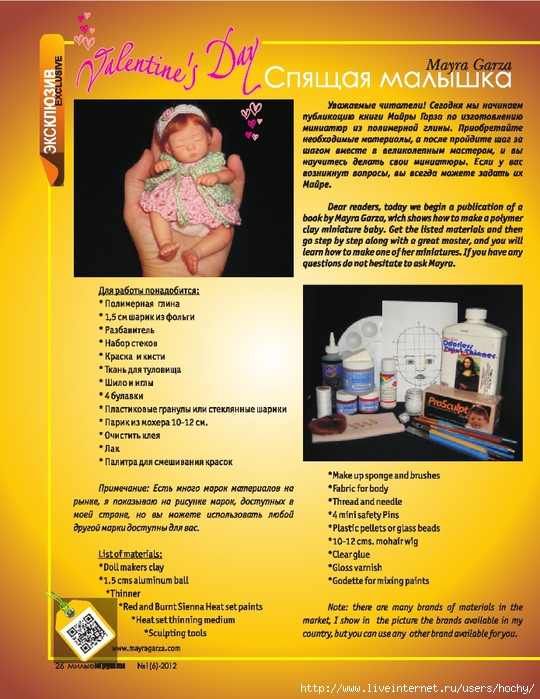
—п€ща€ малышка (лепка головы) - из журнала Pretty Toys є1(6) 2012 |
Ёто цитата сообщени€ hochy [ѕрочитать целиком + ¬ свой цитатник или сообщество!]
|
Ћепим младенца с м€гким тельцем: от чертежа до запекани€ |
Ёто цитата сообщени€ јѕЋя- [ѕрочитать целиком + ¬ свой цитатник или сообщество!]
ѕрилепила бумажку к бумажечке,
ѕрив€зала € ниточку к ниточке,
» пришила € тр€почку к тр€почке.
¬от так родилась мо€ девочка -
√олова ты мо€, бумажна€,
ƒуша ты мо€, тр€пична€.
Ѕедн€жка мо€, сердешна€…
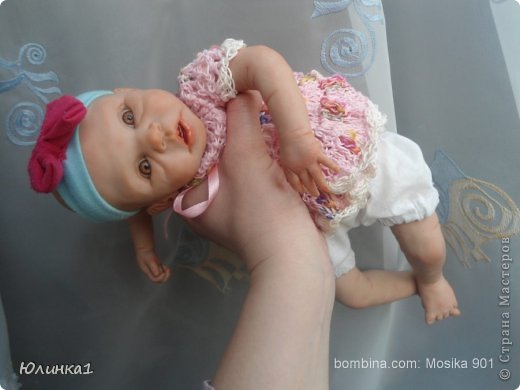
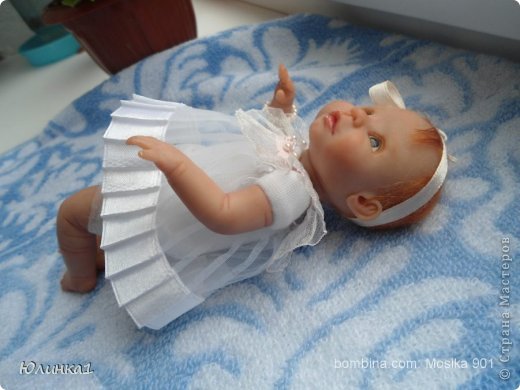
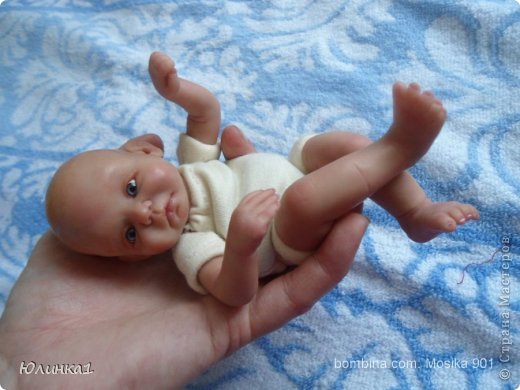
Ётот стишок наверн€ка подойдет к первым моим куклам, и то в том случае, если € решусь на их создание. ј вот милейшие младенцы ёлинки1 просто очаровывают своей непосредственностью и мастерством автора. ќгромное ей спасибо!
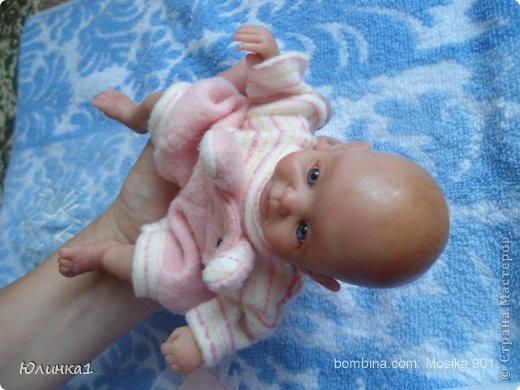
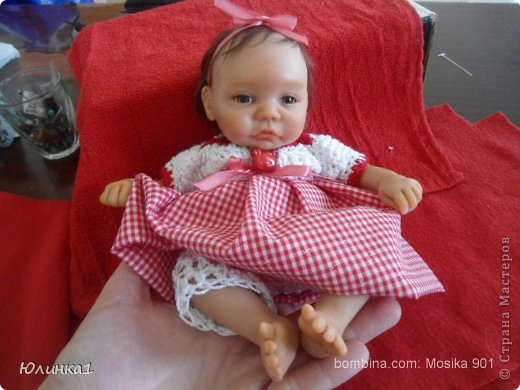
|
Ћепим младенца из полимерной глины.≈ще один очень подробный ћ |
Ёто цитата сообщени€ kumushki [ѕрочитать целиком + ¬ свой цитатник или сообщество!]
|
»менинница. |
Ёто цитата сообщени€ zoih [ѕрочитать целиком + ¬ свой цитатник или сообщество!]
|
ак слепить куколку |
Ёто цитата сообщени€ XAHOBA87 [ѕрочитать целиком + ¬ свой цитатник или сообщество!]
|
ћышка Ћюси и цветок Ц процесс создани€ |
Ёто цитата сообщени€ Dezi-ya [ѕрочитать целиком + ¬ свой цитатник или сообщество!]
http://masterlobzik.ru/master-class/lucy-creation#more-1148
 ¬ мастер-классе € описываю процесс создани€ авторской куклы "Ћюси и цветок". ќсобое внимание удел€ю встраиванию светодиода и батарейного блока.
ћастер-класс был опубликован в летнем выпуске журнала " укольный мастер" є5 (29).
»спользуемые материалы:
|
ак сделать реалистичные глазки дл€ куклы |
Ёто цитата сообщени€ –ежевл€нка [ѕрочитать целиком + ¬ свой цитатник или сообщество!]
|
ѕропорции, размеры тела и головы миниатюрных кукол |
Ёто цитата сообщени€ Dezi-ya [ѕрочитать целиком + ¬ свой цитатник или сообщество!]
ќсновные кукольные пропорции
—равните голову куклы-подростка в масштабе 1:12 с головой взрослой куклы в масштабе 1:12.

|
Ћепка туловища миниатюрной куклы |
Ёто цитата сообщени€ Dezi-ya [ѕрочитать целиком + ¬ свой цитатник или сообщество!]
—оздание кукольной миниатюры – это увлекательнейшее зан€тие. —воими руками можно сотворить целый мир, полный загадки и очаровани€! ѕоэтому этот вид рукодели€ дл€ дома становитс€ с каждым годом все попул€рнее.
«ачастую простые куклы дл€ кукольных домиков изготавливаютс€ без туловища. Ќо иногда, если нужно сделать куклу в открытом платье, в слегка расстегнутой рубашке или в любой открытой одежде дл€ определенных сценок, можно сделать целое туловище. аркас дл€ него изготавливаетс€ из проволоки. ¬ данном холодный фарфор мастер-классе продемонстрировано, как можно сделать простое туловище дл€ куклы женского пола. ѕри желании, можно добавить больше деталей. ÷ель создани€ такого туловища – демонстраци€ открытого плать€ с несколькими вырезами.

“уловище миниатюрной куклы
‘ормирование каркаса из проволоки
аркас дл€ туловища куклы из холодного фарфора должен быть сформирован из твердой проволоки. ≈сли вы уже сделали голову куклы и укрепили ее проволокой, вы можете использовать эту проволоку дл€ каркаса тела, плюс проволоку дл€ рук (как показано на фото).
|
ак сделать голову миниатюрной куклы |
Ёто цитата сообщени€ Dezi-ya [ѕрочитать целиком + ¬ свой цитатник или сообщество!]
ƒл€ чего нужны миниатюрные куклы?
≈сли у вас есть коллекци€ миниатюр или кукольный домик, возможно, вам будут нужны персонажи дл€ создани€ различных сценок. »ногда могут понадобитьс€ и миниатюрные головы дл€ демонстрации драгоценностей и шл€п. »зготовить своими руками голову куклы из холодного фарфора довольно просто. ≈сли вы создаете персонажей дл€ кукольного домика или в другом масштабе, вам необходимо учитывать их возраст, основные черты и, как вариант, можно создавать миниатюрных кукол, похожих на людей, которых вы знаете.
ѕроцесс лепки кукольной миниатюры требует практики. ј дл€ того, чтобы изготовить качественную куклу, необходимо вначале немного поэкспериментировать. ¬ первую очередь, определите, насколько измен€ютс€ формы и вм€тины на готовом изделии после его высыхани€. ѕри изготовлении миниатюрной куклы можно использовать обычный рецепт холодного фарфора.

|
аркас дл€ куклы |
Ёто цитата сообщени€ Dezi-ya [ѕрочитать целиком + ¬ свой цитатник или сообщество!]
ѕеревод автоматический
 ¬з€ть кусок провода 2 м (80 дюймов) в длину и сложите ее пополам. ¬ы сделаете петлю 2 см (0.80 мм) и скрутите проволоку 1,5 см (0.60 мм) дл€ шеи. рис.1


|
∆енска€ фигура „асть-2 |
Ёто цитата сообщени€ Dezi-ya [ѕрочитать целиком + ¬ свой цитатник или сообщество!]
|
∆енска€ фигура „асть-1 |
Ёто цитата сообщени€ Dezi-ya [ѕрочитать целиком + ¬ свой цитатник или сообщество!]
јвтор - ¬ этой скульптуре, € использую 1/2 "ѕ¬’ труб, арматуры. ѕри лепке использую –ома Plastilina є 2 —ерый «еленый масл€ной основе .
ѕримечание: Roma Plastilina — (Sculpture House Roma Plastilina Modeling Clay) - –имский пластилин: масса на масл€ной основе дл€ лепки, то есть обыкновенный скульптурный одноцветный пластилин. ¬ работе можно смело использовать любой пластилин нужной вам м€гкости. ¬ отличие от отечественных производителей, зарубежный пластилин бывает разной степени м€гкости:
ћ€гкий. »спользуетс€ дл€ изготовлени€ больших скульптур.
—редний. ¬ основной используетс€ дл€ лепки лиц, бюстов и т.п.
—редне-жЄсткий. »спользуетс€ дл€ изготовлени€ небольших работ.
Ёкстра-жЄсткий. »спользуетс€ дл€ высоко детализированных моделей.
|
Ћепка мужской фигуры на каркасе ч.5 |
Ёто цитата сообщени€ Dezi-ya [ѕрочитать целиком + ¬ свой цитатник или сообщество!]
|
Ћепка мужской фигуры на каркасе ч.4 |
Ёто цитата сообщени€ Dezi-ya [ѕрочитать целиком + ¬ свой цитатник или сообщество!]
|
Ћепка мужской фигуры на каркасе ч.3 |
Ёто цитата сообщени€ Dezi-ya [ѕрочитать целиком + ¬ свой цитатник или сообщество!]
|
Ћепка фигуры на каркасе ч.1 |
Ёто цитата сообщени€ Dezi-ya [ѕрочитать целиком + ¬ свой цитатник или сообщество!]
|
Ћепка фигуры на каркасе ч.2 |
Ёто цитата сообщени€ Dezi-ya [ѕрочитать целиком + ¬ свой цитатник или сообщество!]
|
Ћепка куклы от Ќадежды Ёванс ч.2 |
Ёто цитата сообщени€ Dezi-ya [ѕрочитать целиком + ¬ свой цитатник или сообщество!]
|
Ћепка куклы (начина€ с каркаса) от Ќадежды Ёванс |
Ёто цитата сообщени€ Dezi-ya [ѕрочитать целиком + ¬ свой цитатник или сообщество!]
|
»зготовление каркаса тела куклы |
Ёто цитата сообщени€ Dezi-ya [ѕрочитать целиком + ¬ свой цитатник или сообщество!]
|
1.ћоток проволки диаметром примерно 0,6мм 2.ѕласкогубцы что эту самую проволку гнуть и резать 3.немного пупен.фимо дл€ создани€ таза и грудного отдела каркаса. 4.»нструментик с лопаточкой на конце дл€ работы с пластикой. 5.Ўаблон(файлы вз€ты на нашем сайте и распечатаны в фотошопе) 6.ћаркер,чтоб делать пометки на каркасе
ќтмотал на глаз проволки.(в этот раз померил дл€ любителей точности,вышло гдето 30см. ћожно было спокойно и меньше использовать)
|
|
ћастер-класс по изготовлению каркаса дл€ авторской куклы из паперкле€ |
Ёто цитата сообщени€ Dezi-ya [ѕрочитать целиком + ¬ свой цитатник или сообщество!]
ƒл€ работы нам понадобитс€:
бумага
карандаш
проволока диаметром 2.5 мм
кусачки
наша уже слепленна€ голова.

—начала рисуем будущий скелет. ƒл€ определени€ высоты куклы за единицу измерени€ принимаем ее голову.
Ќа бумаге откладываем 7 голов. Ќа уровне второй головы отмечаем грудь. 2/3 рассто€ни€ между 2 и 3 – это тали€. Ќа уровне 3 – пупок. Ѕедра располагаютс€ на ¼ рассто€ни€ между 3 и 4. ƒорисовываем их шире или уже, в зависимости от задумки. Ќа уровне 5 отмечаем колени. –уки делаем чуть длиннее уровн€ 4. ƒорисовываем плечи, соответственно полу куклы.
|
ак сделать каркасную куклу. ћастер-класс |
Ёто цитата сообщени€ Dezi-ya [ѕрочитать целиком + ¬ свой цитатник или сообщество!]
аркасную куклу сделать не так сложно, как кажетс€. Ётот мастер-класс подробно объ€снит, как сделать прочный каркас дл€ куклы, обт€нуть его материалом с наполнителем и прикрепить лепные голову, руки и ноги.
ƒл€ изготовлени€ основы вам потребуетс€ проволока. я брала медную в оплетке, толщиной 4мм. —разу оговорюсь, что толщина проволоки зависит от величины куклы. „ем больше кукла - тем толще должен быть дл€ нее каркас. ћо€ кукла высотой 35см, поэтому проволоки диаметром 4мм дл€ нее достаточно. тому же в некоторых местах дл€ прочности проволока беретс€ в два сложени€ и переплетаетс€, чтобы каркас куклы был прочнее. ƒл€ работы с проволокой потребуютс€ кусачки, и, если вы не уверены в силе своих рук, плоскогубцы и круглогубцы дл€ того, чтобы обмотка получилась как можно более тугой и проволока не стремилась "расползтись".
ƒл€ обт€гивани€ используетс€ обычный, хорошо т€нущийс€ трикотаж. Ћучше брать такой, который при нат€жении не пускает "стрелок". — ним работать будет удобнее.
¬ качестве наполнител€ используетс€ обыкновенный синтепон.
»так, чтобы сделать каркасную куклу нам потребуютс€:
ћедна€ проволока, кусачки, круглогубцы или плоскогубцы, трикотаж, синтепон, нитки, иголки, булавки, лепные части каркасной куклы - голова, руки и ноги.
–ассказывать о создании каркасной куклы € буду на примере своего "первенца" - каркасной куклы Ћатиф.
|
|
|
—п€ща€ малышка (лепка головы) - из журнала Pretty Toys є1(6) 2012 |
Ёто цитата сообщени€ hochy [ѕрочитать целиком + ¬ свой цитатник или сообщество!]
|
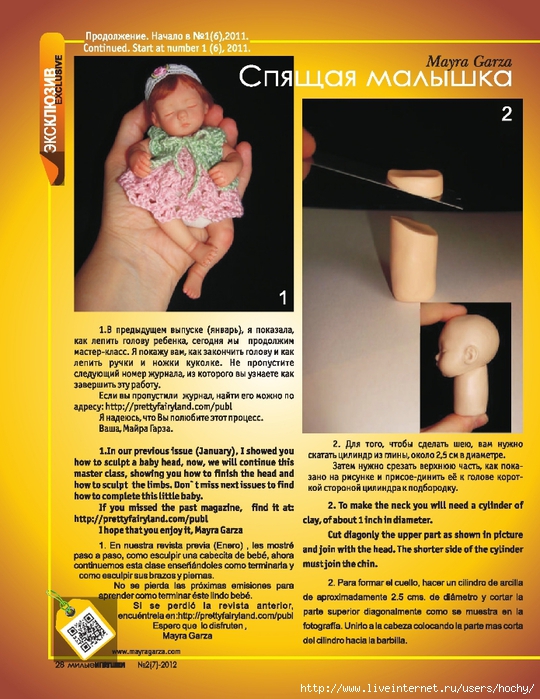
—п€ща€ малышка 2часть(лепим шею, ручки, ножки) - из журнала Pretty Toys є2(7) 2012 |
Ёто цитата сообщени€ hochy [ѕрочитать целиком + ¬ свой цитатник или сообщество!]
|
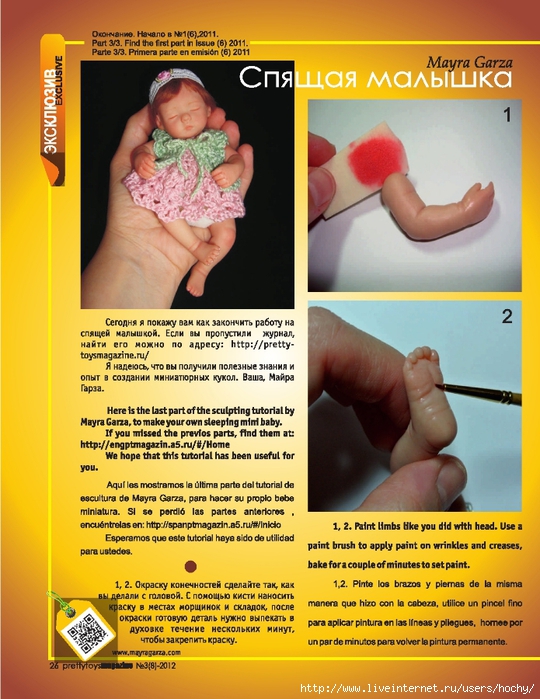
—п€ща€ малышка 3часть(заключительный этап - сборка) - из журнала Pretty Toys є3-2012 |
Ёто цитата сообщени€ hochy [ѕрочитать целиком + ¬ свой цитатник или сообщество!]
|
Ћепка (холодный фарфор,бисквит) |
Ёто цитата сообщени€ TomaMos [ѕрочитать целиком + ¬ свой цитатник или сообщество!]
|
∆урнал "Fimo Folk" (лепка) |
Ёто цитата сообщени€ TomaMos [ѕрочитать целиком + ¬ свой цитатник или сообщество!]
|
∆урнальчик. по лепке |
Ёто цитата сообщени€ besta-aks [ѕрочитать целиком + ¬ свой цитатник или сообщество!]
|
Ќожки малыша |
Ёто цитата сообщени€ zoih [ѕрочитать целиком + ¬ свой цитатник или сообщество!]
|
ак сделать малышей из пластики (книга) |
Ёто цитата сообщени€ pawy [ѕрочитать целиком + ¬ свой цитатник или сообщество!]
|
Ћепим младенца с м€гким тельцем: от чертежа до запекани€ |
Ёто цитата сообщени€ јѕЋя- [ѕрочитать целиком + ¬ свой цитатник или сообщество!]
ѕрилепила бумажку к бумажечке,
ѕрив€зала € ниточку к ниточке,
» пришила € тр€почку к тр€почке.
¬от так родилась мо€ девочка -
√олова ты мо€, бумажна€,
ƒуша ты мо€, тр€пична€.
Ѕедн€жка мо€, сердешна€…
Ётот стишок наверн€ка подойдет к первым моим куклам, и то в том случае, если € решусь на их создание. ј вот милейшие младенцы ёлинки1 просто очаровывают своей непосредственностью и мастерством автора. ќгромное ей спасибо!


|
Ћепка рук из пластики |
Ёто цитата сообщени€ pawy [ѕрочитать целиком + ¬ свой цитатник или сообщество!]
|
ќчень полезные ссылки дл€ всех кукольников |
Ёто цитата сообщени€ Minchenko_Tatiana [ѕрочитать целиком + ¬ свой цитатник или сообщество!]
|
укольникам и не только - пластик и т.д. |
Ёто цитата сообщени€ Helenochka-01 [ѕрочитать целиком + ¬ свой цитатник или сообщество!]
«апекаемый пластик http://www.manga.ru/doll/view.php?id=96:3
–екомендации начинающим: http://manga.ru/doll/view.php?id=96
ќб инструментах: http://manga.ru/doll/view.php?id=7400
ћосква. јдреса магазинов: http://manga.ru/doll/view.php?id=4952
ак делать ножки: http://manga.ru/doll/view.php?id=1813
“ехнологи€ плетени€ парика : http://manga.ru/doll/view.php?id=1392
ѕолезные кукольникам ссылки : http://manga.ru/doll/view.php?id=3
»нтересные ссылки : http://manga.ru/doll/view.php?id=2
раски по стеклу и о: http://manga.ru/doll/view.php?id=5126
јнатоми€ куклы, шаг за шагом
How to ћake haru`s Doll: http://www.ne.jp/asahi/haru/doll/make/makeindex.htm
Work Room: http://www012.upp.so-net.ne.jp/futoyama/Htm/Howto/workroom.htm
язык €понский, но вроде по фотографи€м всЄ пон€тно.
- –азличные виды пластиков
Ќа русском:
http://alenin.nm.ru/plastik.htm
»стори€ костюма. ¬ыкройки!!!
http://gorod.crimea.edu/librari/ist_cost/военна€
миниатюра (солдатики) своими руками http://www.chen-la.com/
(хорошие советы по лепке и покраске)все на русском
http://www.x-worldcomics.com/
фигурки по комиксам студии MARVEL и другие.
просмотрово-торгующий сайт.
- полезные советы (на английском)- как сделать глаза, волосы, аксессуары
http://www.cely.com/doll/workbook.html
как слепить голову куклы-ребенка: http://www.lewisgoldsteinartanddesign.com/DollTutorialFS.htm
как собрать куклу из готовых деталей
на английском
пригодитс€ как "анатоми€ куклы"
http://home.att.net/~pinktruck/Volks/kit.html
Ќа английском -
как делать каркас тела и вылепить голову, ноги, руки http://members.home.nl/asrai/cursus-en.htm
фигурка в стиле "аниме" http://codyscoop.com/howto.html
- ћастер-класс из журнала укольный ћастер
http://www.dollmaster.ru/masterclass.html
http://www.ljplus.ru/img/deedl/page1.jpg
Deedlith (спасибо ей большое) с ∆∆ выложила книгу Ќадежды √енсицкой "»стори€ одной куклы" - создание куклы из запекаемого пластика с нул€. Ќужно мен€ть номера страниц с 1 по 66. нига выложена полностью, очень рекомендую скачать, так как вышла она ограниченным тиражом (1000 экз) и стоит 600 руб. ƒельные советы, хорошие иллюстрации.
- www.wargames.ru - форум-мастерска€. лепка+покраска
www.warhammer-online.ru - форум-мастерска€ - в основном покраска
www.model.otaku.ru - фантастика и аниме в модел€х.
- ое-что об изготовлении текстильной барельефной куклы:
http://gal-gri.narod.ru/secrets.html
www.artdolls.ru
Ћучший сайт о куклах
- www.n-collection.ru
∆урнал " оллекци€ N*" - все из мира коллекционировани€ авторских кукол, старинной и современной авторской игрушки, кукольных домиков и миниатюры, кукол из мультипликации и кукол-марионеток... алендари международных выставок и кукольных шоу, всемирные конкурсы и встречи с художниками, экскурс в прошлое и мастер-классы мастеров... –екомендую подписатьс€!
http://www.n-collection.ru/master.htm
мастер-класс Ќатальи √орбуновой
http://puchimadam.com/pages/lab_saran.htm
—кальп куклы. очень интересно
- "как сделать јнгела"
урок ћарата
http://www.ntv.ru/programs/family/kv/index.jsp?part=Vesch&eid=272
- http://www.siue.edu/COSTUMES/COSTUME15_INDEX.HTML
оп€ть о костюме :)
- http://www.dab.hi-ho.ne.jp/runo/class/ мастер-класс по текстильным куклам. уклы разной степени сложности. ¬ы не поверите что этот человек делает из трикотажа. «айдите, не пожалеете . ¬се: от кукол взрослого и ребенка до одежды, обуви, плюс животные. Ћюблю €понцев за толковые сайты.
¬от ссылка на €поно€зычный сайт, где описываетс€ изготовление куклы из ÷ернита.
“екст, €сное дело, бесполезен, но вот фотографии зан€тные.
http://naokodoll.altervista.org/howtosc.htm
“р€пична€ кукла / тр€пична€ кукла-электрогрелка:
€зыки: €понский, английский
http://doku.bimyo.jp/
- http://www.n-collection.ru/shop/
ќткрылс€ интернет-магазин дл€ кукольников! ѕочтова€ доставка. —истема скидок. ѕосто€нное обновление. ћатериалы, литература. –ассылка новостей дл€ посто€нных покупателей.
- ќткрылс€ интернет журнал дл€ художников и коллекционеров м€гкой игрушки
http://www.toptgin.narod.ru/
http://daveandheidi.com/pages/fita/index.html
и ещЄ одна-
http://www.patriciarosestudio.com/html/home.html
- уклы в кукольном театре. http://www.golden-nugget.sitecity.ru
- авторска€ кукла - http://www.zhans.ru/
- ое-что о декорировании тканей на сайте "јлЄнины куклы" : http://alenin.nm.ru/decor.htm
- http://www.magicminiatures.com/TutorialIndianDoll.htm
как сделать девушку в индийском костюме
- http://drakonyelogovo.narod.ru/
—айт "ƒраконьего Ћогова" в разделе "ћастерска€" - ссылки на все имеющиес€ на данны момент мастерклассы.
- ≈сть много интересного по комплектующим в интернет-магазине http://www.rustoys.orel.ru или на http://www.rus-toys.ru
http://kukladom.nm.ru
можно купить фарфоровые головки ручки ножки
–аботают с кукольниками
http://www.natahaus.ru/2006/09/08/e_kunina__kharakternye_kukly_iz_polimernykh_mass.html
нига ≈лены униной "’арактерные куклы из полимерных масс". ѕомимо фотографий ее работ, в том числе крупным планом, книга содержит 37 распространенных ошибок начинающих, касающихс€ голов, рук и ног, как-то: отсутствие затылка, зубы по пр€мой, ногти во всю фалангу и т.д. Ќу и плюс советы по пластикам, лепке, покраске и декорированию. ќчень полезно! нига в формате DejaVu.
“ам же на Ќатахаусе есть книги √енсицкой, јндриановой и иностранных авторов.
http://white.sakura.ne.jp/%7Efirst_fast/Column/Column.htm
—айт, посв€щенный изготовлению аниме-фигурок. ѕодробнейшее описание процесса, инструментов, материалов. Ќа €понском.
http://www.dollbooks.ru/
ниги о куклах и мишках “едди. нижный форум
http://www.dollery.ru/gallery_kv_2.html здесь замечательные куклы.
http://nasedkina.com/blog/?p=18
шарнирна€ кукла
как сделать куклу на шарнирах.японский сайт на английском:)
http://www2d.biglobe.ne.jp/~dhnoah/make_00.htm
‘орум ” Ћџ –” » јвторские коллекционные куклы и медведи » ѕолимерные глины http://forum1.kukly.ru/forums.php?forum=24&PHPSESSID=f5571f0b1743d116d0d926bf3c2f88f6
http://ceramic.narod.ru/doll.html уклы —ветланы ¬иноградской.
http://putkioto.narod.ru/DressGallery.html японский костюм (довольно подробно. ¬се костюмы - на куклах)
http://ring.gerdesdesign.com/cgi-bin/list.pl?ringid=artdoll
сайты кукольников
http://www.fadeeva.com/Russian/animals_ru.html обалденные м€гкие игрушки;))))
http://junegoodnow.com/artistdolls.html индейцы:)
http://www.studiowillich.com/SDpage.htm
http://www.bonniesdolls.com
сайт с очень красивыми куклами: http://www.illness-illusion.com/main/main.htm
» еще:http://dream.gothiclibrarian.net/
http://members.jcom.home.ne.jp/hizukidoll/
€понский сайт с куклами (много ссылок)
- http://dream.gothiclibrarian.net/
ќ„≈Ќ№ красивые готические куклы
- http://dolls.look.ru/
вот и еще чуть-чуть
- куклы ќлины ¬ентцель: фарфор, текстиль. я не фанат, но может, кому понравитс€
http://dolls.look.ru/gallery3.html
уклы ≈лены Ѕазылевой: очень интересна€ техника: головы из поролона, обт€нутого капроновыми колготками.
http://dolls.look.ru/gallery3.html
“р€пичные куклы. ѕростые, но забавные.
http://pyankova.narod.ru/
уклы —веты ¬ишн€ковой. Ѕарышни.
http://sveta.newslab.ru/
уклы “ать€ны апрановой. “р€пичные. „увствуетс€ школа театрального кукольника(как утверждает эксперт:))
http://www.fullmoon.ru/dolls/
÷еннейшие сведени€ о народном костюме. Ќо картинки мелковаты. :(
http://www.asik.ru/galerea.html#
уклы ≈ленф ≈лисеевой: ткани, керамика, прочие материалы. 6)
- вот сайт одной девушки. ¬се представленные куклы она оформила, тела и головы производства офигенной фирмы VOLKS
http://milkshakemelody.com/index2.html
а вот и сайт, где продаютс€ все необходимые "запчасти". ак сказал про него один мой знакомый "сайт-собери девушку своей мечты" :)
http://www.volks.co.jp/en/goods/index_goods.aspx?sbct=32&page=1&parts=7
http://www.dollart.ru/rus/artists/
http://www.alexandra.ru/
http://www1.linkclub.or.jp/~hisaba/zzz/dl_top.html
- —айт-журнал Ћады онстантиновой,
сотрудничество с кукольниками:
http://www.lartdoll.net/
»нтересный сайт кукольника
и ходожника ёри€ Ўпаковского,
посмотрите его рентгенографику
http://www.art-dolls.com/index.html
- много хороших фото хороших кукол http://www.dollmakersjourney.com/opatterns.html
- http://www.doll-skill.com/
луб-студи€ укольна€ коллекци€
фоторепортажи с выставок ссылки на галереи авторов.
http://home.tula.net/amr-museum/bogoroditsk/russ/exibit.htm
уклы √алины Ѕелеховой, папье-маше
- http://elina-dolls.boom.ru/photoalbum.html
уклы ≈лины ясер, папье-маше
http://www.dolly.aaanet.ru/gallery56.html
уклы “ать€ны Ѕунь, папье-маше.
http://www.blastmilk.com
тут такие аффигенные куклы
»нтересные работы двух художников - кукольников:
http://gal-gri.narod.ru √алина √ричанова
http://orlomarina.narod.ru ћарина ќрлова
Ѕамбольские куклы, можно посмотреть тут:
http://www.bambola.ru
Ѕесподобные керамические детки
http://www.camilleallen.com/
http://www.n-collection.ru/
специализированный журнал об авторской кукле
Ќарод, вы Ё“ќ видели?
http://vavi.ru/img/dolls/01.jpg
- вот такие смешные рэпперы
см http://www.urbanvinyl.ru/projects.asp?id=3
http://www.cosplay-land.narod.ru/konkurs.html - случайно найдено.... может кто захочет поучаствовать... :)))
ќ„≈Ќ№ здоровские €понские куклы!!
http://www.jttk.zaq.ne.jp/higuri/dtig/kira/kira.htm
http://www.kiradoll.com/
http://www.faeryhaven.com/gallery.html еще один сайт про полимерных кукол
http://www.libraryreference.org/index.php?c=Arts/Crafts/Modeling_Compounds/Polymer_Clay/Dolls цела€ библиотека сайтов про полимерных кукол
ћарионетки из дерева
http://www.masterovoy.com/mario.htm
http://www.sarahniemela.com/gallery/gallery.htm
http://www.beck-vostok.de/dmoz.php3?/Shopping/Crafts/Dolls/Art_Dolls/
ј здесь вообще куча интересных ссылок по теме
http://www.n-collection.ru/shop/
»нтернет-салон дл€ кукольников. ƒоставка, посто€нное обновление, рассылка новостей. ћатериалы, литература, галере€
обалдеть !!!
http://www.marilynstivers.com/
и еще тут можно полистать
http://www.ruthmarks.com/NIADA%20for%20web/NIADA%20for%20web.html
"“оптыгин и о" http://www.toptgin.narod .ru/ интернет журнал дл€ художников,коллекционеров и ценителей авторской и коллекционной м€гкой игрушки - обновление сайта!
http://www.patriciarosestudio.com/html/tutorial.html - ну сами посмотрите :)
http://www.zephyr.dti.ne.jp/~runo/eng/eindex.html
http://www.mindstorm-inc.com/pages/vid/sc01.html
http://www.mindstorm-inc.com/pages/vid/sc02.html
http://www.toymania.com/columns/spotlight/psycholdd.shtml
ќговорюсь сразу: на любител€, эдака€ сабкалчер... Ќо мне понравилось))
http://doll.mda.or.jp/~naruto/ куклы из €понии (сайт красиво оформлен.)
http://www.ventsel.ru/Gallery9.html - много фарфоровых кукол, костюмы просто ¬ј’!!!
http://www.ozzdollsfactory.com/galerie.php
классна€ ссылка, особенно дл€ любителей стрэнж
http://kukladom.nm.ru
ѕрибамбасы дл€ кукол из фарфора –аботают с кукольниками
|
Ћепка младенцев- два способа доводки |
Ёто цитата сообщени€ veda_67 [ѕрочитать целиком + ¬ свой цитатник или сообщество!]
|
ћастер-класс "–ука из полимерной глины" |
Ёто цитата сообщени€ Dezi-ya [ѕрочитать целиком + ¬ свой цитатник или сообщество!]
|
|
 ¬ истории искусства есть множество примеров, когда лицо на картине или в скульптуре изображено гораздо более виртуозно, чем руки. ќбратна€ же ситуаци€ практически не встречаетс€. »з этого можно сделать вывод, что руки - сама€ сложна€ дл€ изображени€ часть тела. ћой опыт преподавател€ и зрител€ говорит, что и в нашей маргинальной кукольной норке те же проблемы. » хот€ руки моих кукол тоже не исключение, € все же надеюсь, что этот ћ будет кому - нибудь полезен. Ёто перва€ часть, в ней показано, как сделать универсальную основу дл€ руки взрослого человека. ак придать ей индивидуальные особенности, чтобы сделать мужскую, женскую, старческую руку, худую или полную, руку в перчатке - во второй части ћ . ¬ третьей части - о жестах, закреплении в руках аксессуаров, о кольцах. ј также о хитрост€х обжига рук. ¬опросы, замечани€, пожелани€ приветствуютс€! “олько не пишите мне, пожалуйста, про качество фоток: € лучше не умею( 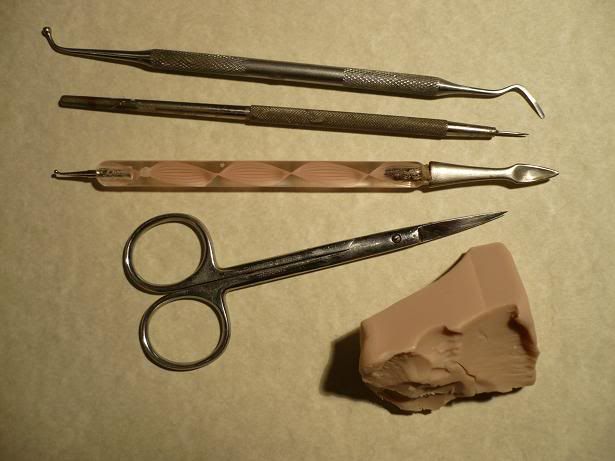 ак определить примерный размер кисти: - длина - от нижней точки подбородка до брови ( на самом деле кисть длиннее, но когда мы добавл€ем массу дл€ суставов, пальцы выт€гиваютс€) - ширина - половина лица (по линии глаз ) до носа. - толщина зависит от толщины пальцев.     http://ekdolls.livejournal.com/22539.html |
|
ќчень подробный ћ по кукольной ножке! |
Ёто цитата сообщени€ Ѕайкалочка_10 [ѕрочитать целиком + ¬ свой цитатник или сообщество!]
—тащила отсюда http://members.home.nl/asrai/cursus-en.htm
|
The foot in this tutorial is from heel to big toe about 1.8 inch long. Always use the head as a comparison for the size of the feet. The length of the feet is equal to the size of the head. |
 |
 |
|
In this tutorial I will only make the right foot. Try to work simultaneously on both feet because it is hard to make an equal looking foot afterwards. You start off by making a 2.5 inch long cylinder shaped roll of clay, about 0.8 inch thick (pict. 1). Bend the roll of clay in an angle like in pict. 2. The top will become a part leg and the other part the foot. |
|
 |
 |
| Flatten the clay by pressing it together between thumb and point finger towards the 'toes'. Be careful not to make it too flat. (pict. 3 + 4). | |
 |
 |
|
Now it is time to form the heel. Push/smear some clay from under the foot backwards (towards the heel) and push/smear some clay from the lower leg down (towards the heel) (pict. 5). This way you'll get more clay on the heel and a better shape at the sole of the foot. Press the clay with your thumb on the inside of the foot to make it more hollow (pict. 6). |
|
 |
 |
|
Before you can make incisions for the toes, the front of the foot needs to be reshaped a bit. Cut off a piece of clay slantwise starting at the 'big toe' (pict. 7). After this smooth the edge with your fingers (pict. 8). |
|
 |
 |
|
Look at the foot to see if it's not too thick, if it is you can make it thinner by smearing the clay from the instep to the leg. You can also smear clay upwards just above the heel towards the leg, this way the foot will become slimmer (pict. 9). Sculpt as smooth as possible, use a damp finger to rub the clay for a smooth finish. Now you can make incisions for the toes with the help of a sharp tool. Don't forget the big toe needs to be bigger than the other toes (pict. 10). |
|
 |
 |
|
Spread out the toes gently so you have more working space (pict. 11). Hold the toes one by one between your point finger and thumb. While warming the clay by the warmth of your hands, very gently roll the toes slightly back and forth, so the inside of the toes will also become round. This will probably make the toes become too long but that doesn't matter (pict. 12). When the toes have the right thickness and are nice and round, you can cut them off at the right size. Smooth the edges of the toes with your fingers. |
|
 |
 |
|
You can use a sculpting tool for the areas that are difficult to reach, like between the toes (pict. 13). If everything is nice and smooth, we are ready to make the nails (pict. 14). |
|
 |
 |
|
You could use the small hollow chisel again as I used in the hands lesson, but this time I will sculpt the lines by hand. For this I used a sharp sculpting tool, the one in pict. 10. You could also use a small knife (not too sharp). Press left and right from the 'nail' a straight line in the clay (pict. 15). Now you have to connect those two lines, this is a very precise work. You could also use a sharp wooden toothpick for this (pict. 16). They start to look more and more like real nails. |
|
 |
 |
|
Some polymer clay brands can become overworked, it can become too soft. So at this time I gave the nails some rest and focused on the sole of the foot. Halfway each toe I draw a line on the inside, except the small and the great toe (pict. 17) The nails weren't finished yet. We also have to connect the lines at the front of the toe with a sharp tool, as you can see in pict. 18. |
|
 |
 |
|
Draw lines on the 'knuckle' area of the toes with a small sculpting tool or toothpick , the same way as I did in the hands tutorial. This makes it look more natural (pict. 19). The sole of the foot needs some more modeling. Place 3 slices of clay on the heel, ball and big toe, like in pict. 20, carefully blend the seams with your sculpting tool or fingers until the seams are blended in with the sole. |
|
 |
 |
|
Moisten your finger and polish everything smooth.This also works for removing unwanted fingerprints. At pict. 21 you can see a sideview of the foot, it looks much better now because of the modeling we did at the sole of the foot. Use a sculpting tool or rubbertip brush to add lines to accentuate the tendons/bones of the foot (pict. 22). |
|
 |
 |
|
Rub the lines with a wet finger to blur and make it look more natural (pict. 23). Now it's time to make the knuckles on the ankles. Before you start check out the foot from all sides to see if it still looks okay (pict. 24). |
|
 |
 |
|
Pay attention to the ankle area that it is not too fat. If it is you still have the chance now to sculpt it slimmer (pict. 25). Place a small slice of clay on both sides of the ankle where the knuckle should be. Study your own foot to see how this looks (pict. 26). |
|
 |
 |
|
Blend the seams with a sculpting tool (pict. 27), don't blend it too wide because it wouldn't look like bone anymore. Just blend only the edges. Gently rub over the knuckles with a slightly wet finger to make it smooth (pict. 28). |
|
 |
 |
|
The foot is almost ready now. Before curing check the feet from all sides and correct any mistakes, don't forget the sole of the feet (pict. 29 + 30). |
|
 |
 |
|
Cut off the leg at about 1.40 inch. Use a wooden toothpick to make a hole in the leg, make sure it's deep enough, about 0.80 inch. Twist the stick a little to make the holes wider so it will fit the armature. I use a small wooden board with big nails through it, as a stand to place the feet on (pict. 31). I pre-heat the oven at 220-266 Fahrenheit and bake the feet for about 30 minutes. Always use an oven thermometer to make sure the oven is at the right temperature, because if it gets too hot the polymer clay may turn yellow/brown. Leave the feet to cool in the oven before you take them out (pict. 32). |
|
 |
 |
|
After cooling down I made it a little smoother by sanding the clay with a polishing sponge. Sometimes rubbing it with a soft cloth is enough. If there are any small scratches visible, you can gently touch them with some acetone on a brush and usually they disappear. Use very little acetone because too much can give white spots on the clay! Next step is painting and coloring the foot. This can be done by either acrylics, watercolor paint or water- or oil based patina. For this foot I use watercolor paint and acrylic paint (pict. 33). First I rub the clay in with some skin powder make-up to give it a warmer tone. The color of the nails was created by blending different shades of watercolor paint. I use a thin paintbrush to apply the paint, I paint the nails several times, letting it dry in between coats. This paint is transparent and doesn't really stick to the clay. So you need to do this a few times, some of the paint's pigment will be absorbed by the clay, just enough for a natural color (pict. 34). |
|
 |
 |
|
I mix white acrylic paint with a bit black or yellow to get an off-white shade. With a very thin painting brush I paint the 'half moons' and the 'nail borders' (pict. 35). After the paint is dry I add some Fimo gloss varnish (not the water-based one) to finish the nails (pict. 36). I like this varnish a lot, it will not turn yellow and even after several years it will still look glossy. Now the foot is finished...! (pict. 37) |
|
 |
|
|
You can now attach the feet to the armature. If the hole in the leg is too wide you can add some papertape to the wire for a better fit. Later on you can use some glue (for instance hot glue gun) to attach them permanently.
|
|
 |
|
| The best moment for this depends on the kind of clothes he or she will be wearing. Sometimes it is easier dressing the doll, if the feet can still be detached from the legs. | |
 |
|
|
–уки из полимерной глины. |
Ёто цитата сообщени€ Ўальной_јнгел_13 [ѕрочитать целиком + ¬ свой цитатник или сообщество!]
|
ћастер-класс: ‘ормирование различных частей тела дл€ скульптуры из полимерного пластика |
Ёто цитата сообщени€ Dezi-ya [ѕрочитать целиком + ¬ свой цитатник или сообщество!]

»сточник:
¬идео по формированию cкульптуры из полимерной глины
ак сделать лицо
»зготовление рук
»зготовление ног
|
Ћепка куклы |
Ёто цитата сообщени€ Dezi-ya [ѕрочитать целиком + ¬ свой цитатник или сообщество!]
|
ѕроцесс лепки куклы из полимерной глины. |
Ёто цитата сообщени€ Ќатуральные_камни [ѕрочитать целиком + ¬ свой цитатник или сообщество!]
сожалению картинки без перевода. Ќо всЄ интуитивно пон€тно.
Ќа столько подробный мастер класс, что пон€тен без слов.
|
Ћепка куклы из полимерной глины 2 |
Ёто цитата сообщени€ Ќатуральные_камни [ѕрочитать целиком + ¬ свой цитатник или сообщество!]
Ёта лапул€ похуже первого варианта, но в этом мастер классе хорошо показана лепка лица.
|
ћастер-класс по созданию куклы Ћ≈“»! Ётап 3. –уки. Ќоги.“онировка тела. |
Ёто цитата сообщени€ Ћана_Ѕерг [ѕрочитать целиком + ¬ свой цитатник или сообщество!]
ћ куклы Ћ≈“»! Ётап 3. –уки. Ќоги.“онировка тела. “рикотажный чехол.

«дравствуйте!
ѕродолжаем работу над созданием куклы "Ћ≈“»!"www.livemaster.ru/item/3210251-kukly-igrushki-avtorskaya-kukla-leti .
Ќа данный момент полностью готова голова куклыwww.livemaster.ru/topic/279955-master-klass-po-soz...ospis-volosy?vr=1&inside=1, изготовлен каркас, набран объем тела www.livemaster.ru/topic/280079-master-klass-po-soz...-karkas-telo?vr=1&inside=1.
ƒальше работаю с лепной частью рук и ног куклы. ƒл€ работы мне потребуютс€ следующие материалы:
- ѕаперклей,
- стоматологические инструменты или стеки дл€ лепки,
- качественный секундный клей,
- высушенна€ влажна€ салфетка дл€ выглаживани€,
- вода дл€ увлажнени€ заготовок,
- чай дл€ тонироки,
- среднезерниста€ и мелкозерниста€ шкурки,
- тейплента.
Ќачинаю с лепки кистей рук куклы. ѕодробно процесс лепки ручки можно посмотреть тут www.livemaster.ru/topic/108332-suvenirnaya-kukla-ruchka?vr=1&inside=1 , вкратце это выгл€дит так: —начала леплю четыре пальчика-колбаски, намечаю ногти.
|
ћастер-класс по созданию куклы Ћ≈“»! Ётап 2. аркас. “ело. |
Ёто цитата сообщени€ Ћана_Ѕерг [ѕрочитать целиком + ¬ свой цитатник или сообщество!]
ћастер-класс по созданию куклы Ћ≈“»! Ётап 2. аркас. “ело.

«дравствуйте.
ѕродолжаем работу над созданием куклы "Ћети!"www.livemaster.ru/item/3210251-kukly-igrushki-avtorskaya-kukla-leti
¬ первой части ћ мы слепили голову куклы, расписали ее и приклеили волосы www.livemaster.ru/topic/279955-master-klass-po-soz...ospis-volosy?vr=1&inside=1 .
“еперь можно приступать к формированию каркаса дл€ куклы.
ƒл€ работы нам потребуютс€ следующие материалы и инструменты:
- проволока (у мен€ в€зальна€ сечением 1.2 мм),
- изолента,
- тейплента,
- бумага,
- плоскогубцы,
- ножницы.
|
ћастер-класс по созданию куклы Ћ≈“»! Ётап первый. Ћепка головы.–оспись. ¬олосы. |
Ёто цитата сообщени€ Ћана_Ѕерг [ѕрочитать целиком + ¬ свой цитатник или сообщество!]
ћастер-класс по созданию куклы Ћ≈“»! Ётап 1. Ћепка головы.–оспись. ¬олосы.
«дравствуйте! ѕредлагаю вам вместе со мной шаг за шагом проследить за созданием вот этой куклы: 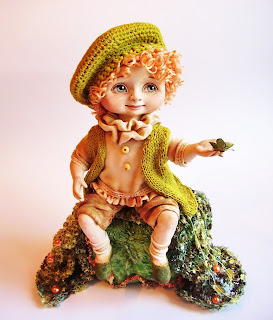
|
ѕодробный мастер-класс по лепке авторской куклы. |
Ёто цитата сообщени€ ElenaDEA [ѕрочитать целиком + ¬ свой цитатник или сообщество!]
»з всех известных мне и опробованных в работе материалов дл€ лепки авторской куклы, дл€ мен€ самым лучшим был и остаетс€ паперклей.
Ёта пластелиноподобна€ масса очень пластична, при€тна на ощупь, прекрасно лепитс€, шкуритс€, не трескаетс€. ѕри необходимости можно долепить части даже к уже засохшему изделию, или срезать лишнее. ≈ю пользуютс€ как профессионалы, так и начинающие мастера.
ƒл€ лепки лица куклы из папрекле€ нам потребуетс€:
|
укольна€ голова из полимерной глины La Doll |
Ёто цитата сообщени€ ElenaDEA [ѕрочитать целиком + ¬ свой цитатник или сообщество!]
¬з€то с благодарностью “”“
ƒл€ начала стоит сделать череп. ак известно, у людей многие черты лица обусловлены именно формой черепа. ƒл€ этого берем кусок пенопласта и вырезаем нужного размера заготовку.
«атем берем лезвие и отрезаем все ненужное. ћногие делают основу круглой, но на мой взгл€д лицо лепить будет намного проще, если форма черепа из пенопласта будет максимально приближенной к форме будущей головы.


огда форма будет готова, берем выбранный материал – у мен€ в этот раз полимерна€ глина La Doll, хот€ он очень похож на паперклей – и небольшими кусками начинаем облепливать череп и хорошо приглаживать их к пенопласту. ќп€ть же есть разные способы облепки, но мне этот нравитс€ больше, т.к. позвол€ет избежать проблемы затаившегос€ воздуха под пластиком, и позвол€ет довольно равномерно нанести слой.


ѕосле того как весь пенопласт скоретс€ под слоем глины, голову можно посушить в духовке – температура 40-50 градусов, 10-20 минут будет достаточно, либо смотрим по степени готовности, если материал уже не влажный, и с него не течет вода, то вполне достаточно. ≈сли больше – может ссушитьс€ в маленький кружочек пенопласт. ѕолучитс€ отлична€ погремушка, но это дл€ следующего раза отложим J
ак уже давно известно всем художникам и не только, пропорции делают человека красивым, многие великие художники пытались изобразить свои идельные пропорции. Ќо поскольку мы только начинаем, нам важно , чтоб было пропорционально хот€ бы приблизительно. ƒл€ этого проводим на голове три окружных линии –
- ѕосредине головы вертикально, котора€ поделит на две зеркальные части, мы будем видеть отклонени€ в парных элементах лица;
- ƒелим посередине головы горизонтально – как известно, на линии середины головы наход€тс€ глаза.
-
ќп€ть же проводим вертикальную окружность приблизительно посередине головы через предполагаемы уши. Ќа это линии они потом и будут размещатьс€, и именно эта лини€ позволит разместить уши на одинаковой высоте и дальности от лица. стати горизотальна€ лини€ будет служить верхней границей
уха.

“еперь, если повертеть гол ову, становитс€ очень хорошо видно, какие участки, которые должны быть пропорциональными, таковыми не €вл€ютс€. Ёто видно на всех 6 плоскост€х головы, кажда€ из которых поделена на 4 части. “еперь наша задача исключить эти отклонени€ . ѕоскольку уже нижний слой у нас высох, то исключить мы их можем только добавлением нового материала.
»так, уравниваем части и заглаживаем голову. ≈ще раз сушим.
» теперь, когда болванка готова, приступаем к самой сложной части головы – лицу.
ќп€ть делим голову трем€ окружност€ми, € этого не сделала сейчас, но думаю, что напрасно, очень помогает.
—начала делаем овальную лепешку, и приклеиваем ее на лоб, инструментом приглаживаем кусок к голове, если плохо прилипает, смачиваем подсохшую голову и все-таки приглаживаем инструментом г олове, и продавливаем две небольшие выемки под глазницы.


ƒелаем полукруглую лепешку - дл€ верхней губы и части котора€ прилегает к носу и чуть возвышаетс€ над остальным лицом. ѕриглаживаем, и нижний край губ делаем волнистый - два загиба по кра€м дл€ улыбки, и два чуть дальше от серединной линии губ. ѕотом делаем небольшую продолговатую лепешечку дл€ нижней губы и приглаживаем так, чтоб середина нижней губы была выпукла€, а кра€ сглаженными. ƒл€ большей реалистичности делаем еще два маленьких шарика – размером примерно с шарики дл€ крыльев носа и приклеиваем в уголках рта, и кра€ рта приглаживаем так, что образовалс€ такой уход€щий в глубину конус.
Ќу и последний штрих – подбородок . Ќебольшой шарик, приклеить и разгладить.

ј теперь, втора€ из самых сложных частей головы – зеркало души. ќсновна€ сложность заключаетс€ в том что глаза, во-первых, наход€тс€ на рассто€нии , их два, и они должны быть симметричны по максимуму. ак известно лини€ глаз у нас находитс€ на середине головы по вертикали, а по ширине головы у нас должно уместитьс€ 5 глаз. ¬ принципе, в кукле все эти пропорции могут нарушатьс€ как в одну так и в другую сторону, но это уже вы будете сами решать, как краше. ƒл€ начала неплохо б справитьс€ с проверенным вариантом — анатомически реалистичным. ƒелим голов на серединной горизонтальной линии на 5 частей, 2 и 4 – будут глазами, в 3 ей – нос. ƒелаем две лепешечки – это будут сами глаза, делаем небольшу колбаску и сплющиваем и прикладываем ее поверх глаз – это бдует верхнее веко. ѕриглажваем.
¬ принципе, аккуратно пригладив, на это можно и остановитьс€. Ќо можно еще круглым инструментом или спицей прожавить нижнее веко. ≈сли смотреть на глаз сбоку, ипровести вертикальную линию от верхнего века, то ближе всего к линии будет веко, потом глаз, и потом нижнее веко.


”же было написала вот и все, но вспомнила про уши. уда ж без них! “ак вот, уши делаютс€ совсем несложно, оп€ть же если выв не преследуете цель сделать их максимально похожими на реальные. ”хо должно располагатьс€ по горизонтали на уровне носа. “.е. вот приблизительно от уровн€ глаз на высоту носа. ћало того – внутренн€€ лини€ уха, имеет тот же наклон, что и нос. ƒл€ самого уха делаем зауженную лепешечку, приплюснутую ушному отверстию. ѕриглаживаем, там где ушное отверстие вообще можно активно вдавить,
далее уже чисто эстетически придаем форму, и небольшой полусмес€ц продавливаем в верхней части уха.

“ут еще нужно отметить, и это относитс€ ко всему лицу, что нельз€ делать сильно тонкие части, потому что при ошкуривании они могут стеретьс€, но если они будут идеально гладко сделаны, возможно не придетс€ так
активно шкурить. ѕросто это надо учитывать. ¬тора€ сторона этого же момента в том, что можно слепить даже довольно грубо, а шкуркой довести до нужного тонкого состо€ни€. ак шкурить в сложных местах мы рассмотрим в большом тренинге. “ак же в большом тренинге мы сможем вместит больше картинок в хорошем
разрешении, т.к. это уже будет полновесный материал дл€ просмотра, а не дл€ страниц интернета, на которых большое количество графики, сильно замедл€ет открытие.
¬от в принципе и все. ќп€ть сушим голову. » нам остаетс€ сама€ малость. ƒождатьс€ высыхани€, и идеально ошкурить голову. ѕылинки смахиваем кисточкой.

ѕро ошкуривание надо сказать самую главную вещь . Ќе надо ленитьс€ шкурить! ѕотому как именно степень ошкуривани€ скажет о вашем старании максимальную информацию. Ќе стоит тратить столько сил по лепке пропорций, по живописности и точности лица, если вы не готовы потратить полчаса-час на идеальное ошкуривание поверхности.
Ќу вот пожалуй по лепке головы все. “еперь лицо можно расписывать. ’от€ дл€ мен€ это всегда очень сложный вопрос, потому что мне ужасно нрав€тс€ вышкуренные, но еще не покрашенные белые головы. ≈сть в этом что-то вдохновл€ющее J…
ѕривееет!…

Ќо голова — это еще не кукла! ” куклы есть еще малюсенькие пальчики, тоненькие ножки, пухлое тельце и шикарный костюм!
|
ћалыши из пластики. |
Ёто цитата сообщени€ ћарина_ ривчун [ѕрочитать целиком + ¬ свой цитатник или сообщество!]
|
| —траницы: | [2] 1 |


